What is Sequins?
Sequins is a hardware-based electronic musical instrument that I've been iterating on in various forms for a couple of years. It is a looper combined with a 16 step sequencer interface that allows a user to slice up their loops and re-sequence them into rhythmic patterns that retain the vibe of the original loop yet apply new characteristics on the fly. If you haven't already seen it, check out my post on developing the initial web-based prototype that I used to validate the general concept and explore UI/UX before diving into the much more complicated hardware version. After going a bit overboard in my explorations of the web prototype, and some time away during the lockdown, it was time to dive into the hardware prototype.
Getting Started

One of my primary goals of this project is to keep the enclosure's footprint as small as possible while still providing a highly tactile experience that can be used with finesse. One of my many inspirations for this project is Teenage Engineering's OPZ, which I bought as soon as it became available, and I which love very, very much. As a portable device the OPZ is clearly a marvel of engineering. However as an instrument I mainly use at home, in many ways the user experience feels cramped and inaccurate to my fingers. While I admit it is not hard to memorize the functions hidden behind the invisible color-coded sub-menus, I wanted to minimize the friction of menu-memorization and menu-diving in Sequins. To me, that means Sequins needs a screen to provide, at the least, integer-level depictions of parameter values.
As you can see, I soon realized that using LCD displays to good effect is more complicated than I originally imagined. More on that later, but for now, being able to display and modify parameters in real time was a great first step.
Push-to-Modify Parameters
In my efforts to avoid menu-diving, I took inspiration from the function keys on a computer keyboard. Rather than forcing the user to scroll through menus to select the parameter they want to modify, I figured I could dedicate a few keys to selecting them. This way, the user can select a parameter with one hand and modify it with another, which is much more convenient and timely. In the context of a live performance, being able to make modifications quickly is paramount.
Displaying a sequence
One of the reasons I chose to use an LCD display is that they have 16 digits, which is convenient as I intended to support up to 16 steps in a sequence. The 'X' represents the currently selected step in the sequence. Here you can see another LCD-related issue that I ran into. Again, more on this later.
Accessibility p0rblems
I was pretty happy with my menu-diving-less UX, and so I refactored my breadboarding situation to more accurately resemble what I had in mind for the finished product. That is, until I tried to film myself using it with one hand, at which point I realized my prototype had a glaring accessibility issue: it was near-unusable with one hand.
Problems solved!
I went back to the drawing board and came up with a single-handed solution that can be used in concert with the multi-handed shortcut. Clicking the rotary encoder jumps into a sub-menu for the selected step, and the currently selected menu item blinks to indicate that it is selected. Clicking the rotary encoder again jumps into the parameter editing menu and allows the user to modify the selected parameters value by turning the knob. I also connected the 16 step buttons to allow the user to quickly select a step by pressing its associated button. Sequins was starting to feel satisfying to use!
Multiplexing problems and operator error
With the general functionality intact, I aimed to move onto adding some flair and working on additional UX improvements: LEDs! In addition to the on-screen integer values, I wanted to employ lights to display additional information about each step. Ideally, there would be a special color to indicate the currently selected step, and the rest of the steps would be color-coded based on their frequency offset from center with the volume represented by the brightness level. For example, steps with the default frequency of 50% could be white, higher frequencies would turn more red, and lower frequencies would turn more blue. In a previous project using seven-segment displays, I successfully used multiplexing to reduce the number of output pins on the microcontroller to the number of LEDs plus a single shared driver pin. I had hoped to take advantage of this technique here, but as you can see in the video below, I failed to take into consideration all the additional pins that RGB LEDs require, and that I was dealing with 16 of them! Attempting to set all of the LEDs to ON at the same time resulted in a dazzling display in which you can literally see the multiplexing at work instead of the expected solid appearance of a high-frequency flickering faster than the eye can see. It was disappointing, but at least I had fun with it!
As if that weren't enough, after hours of painstaking wiring, attempting to light only the selected step proved that I had wired it all backwards...
Finally addressing the LCD rendering issue
The LED/multiplexing failure was definitely a disappointment, and so I went on to try and do something more fun for a bit. While I dug the retro vibe of the black-on-green backlit LCD, I wanted something a bit more modern feeling. So, I hooked up a white-on-blue backlit LCD. I definitely liked it better, but unfortunately the persistent rendering issue became much more prominent and I could no longer ignore it.
The problem felt strangely familiar, and then I realized I had encountered something extremely similar when working on the initial web-based prototype. Whenever I modified the number of beats in the song, the canvas featuring the arrangement view would flicker. It turned out that my canvas renderer was re-rendering the entire canvas, including the beats that were not on-screen. My gut intuition was that the LCD was experiencing a similar issue, considering the limited processing power of my microcontroller.
I decided to build a simple diffing engine for the display, which would keep track of the current state of the display, and within each tick, keep track of any deltas that should be applied before next render. Then, when it came time to render at the end of the tick, I could update only the individual digits that had changes to be applied. It worked like a charm, and suddenly, not only did the display appear markedly more crisp, but the rotary encoder and button presses felt more responsive and accurate due to the reduction in additional cycles required to update the entire display.
Audio Time
With the LCD Display fixed and the UX generally feeling good, it was time to start experimenting with the audio functionality. After a bit of research, I was disappointed to find that Arduinos, even with a dedicated DAC (Digital-to-Analog Converter), are only capable of reliably producing 8bit quality audio. Suddenly it made sense why every Arduino-based audio device/kit is branded as 'lofi'. Still, it at least seemed simple to get started in the lofi realm, and most likely the code I wrote here could be ported over to a higher fidelity system in the future. But first, I had to learn a thing or two about mismatched encoding. Here's what a 16 bit sample of me playing classical guitar sounds like through 8bit PWM (Pulse-width Modulation).
After re-encoding the sample as 8bit PCM (thanks ffmpeg), it still wasn't quite right (due to my code, not the encoding), but it was still pretty cool! I was vibing with the granular textures it produced, and definitely want to make sounds like this possible as a feature in the future!
I modified my code to play the sample to completion on a keypress, and voila! Suddenly I had myself a little lofi sampler to play with. I wrote the song I was sampling, so I'd heard it a million times, but it was still so cool to be able to play with it and construct new songs from it in this way.
Making Sequins finesse-able
Hand-waving LEDs and audio quality, everything seemed to be working splendidly, except for one thing. I didn't feel that using the rotary encoder resulted in a particularly musical or "finesse-able" experience. Sure, rotary encoders enable a user to exercise fine-grained control over a parameter, but it is extremely hard to accurately make large jumps that aren't the full range, i.e. from 100 to 25. I experimented with a few options, such as incrementing by counts of 10 while the encoder is pressed and turned simultaneously, which made a difference, but still felt awkward and inaccurate. One of my heroes, Joel Korte of Chase Bliss Audio had recently announced the Automatone line of guitar pedals, a new form-factor for the Chase Bliss line, which features 6 motorized faders that can jump to previously known positions.

It occurred to me that this same technology might work really well for my use case. So, I ordered one and got to work figuring out how to use it. This was my first time interfacing with a motor, but soon enough I had the fader oscillating between 0 and 100.
I wanted the fader to be able to represent not only the values of the individual step's parameters, which could be stored as floats, but also the selected step itself, which only makes sense stored as an integer. This required coming up with a way to accurately jump to any of the 16 steps. The fader is basically a linear potentiometer with a motor attached to it. By sampling the current value of the potentiometer, and comparing it with the value of the fader positioned at 100%, one can determine generally where it is currently located. That's the easy part. The hard part is getting the motor to move it to where you want it to be. It was a non-trivial task to determine the correct amount of force to apply on each tick, between each measurement, and at first it wasn't particularly accurate. I set up some logs to help debug the delta between the intended location and the actual location, and after determining that there was a margin of error of about 20 units, decided that any delta of 20 or below was good enough.
After a lot of trial and error, and applying an exponential backoff algorithm to reduce the amount of force the motor applies as the fader approaches its target, I was finally satisfied with the results. Sequins could jump to any position extremely quickly, with relatively high accuracy. Since the motor is a potentiometer, using it as an input was a much simpler ordeal. Now that the fader was here to stay, it was time for another breadboard refactor. I upgraded from a traditional Arduino to an ESP32, mostly for the form factor, as it could be inserted directly into the breadboard for a cleaner prototyping experience.
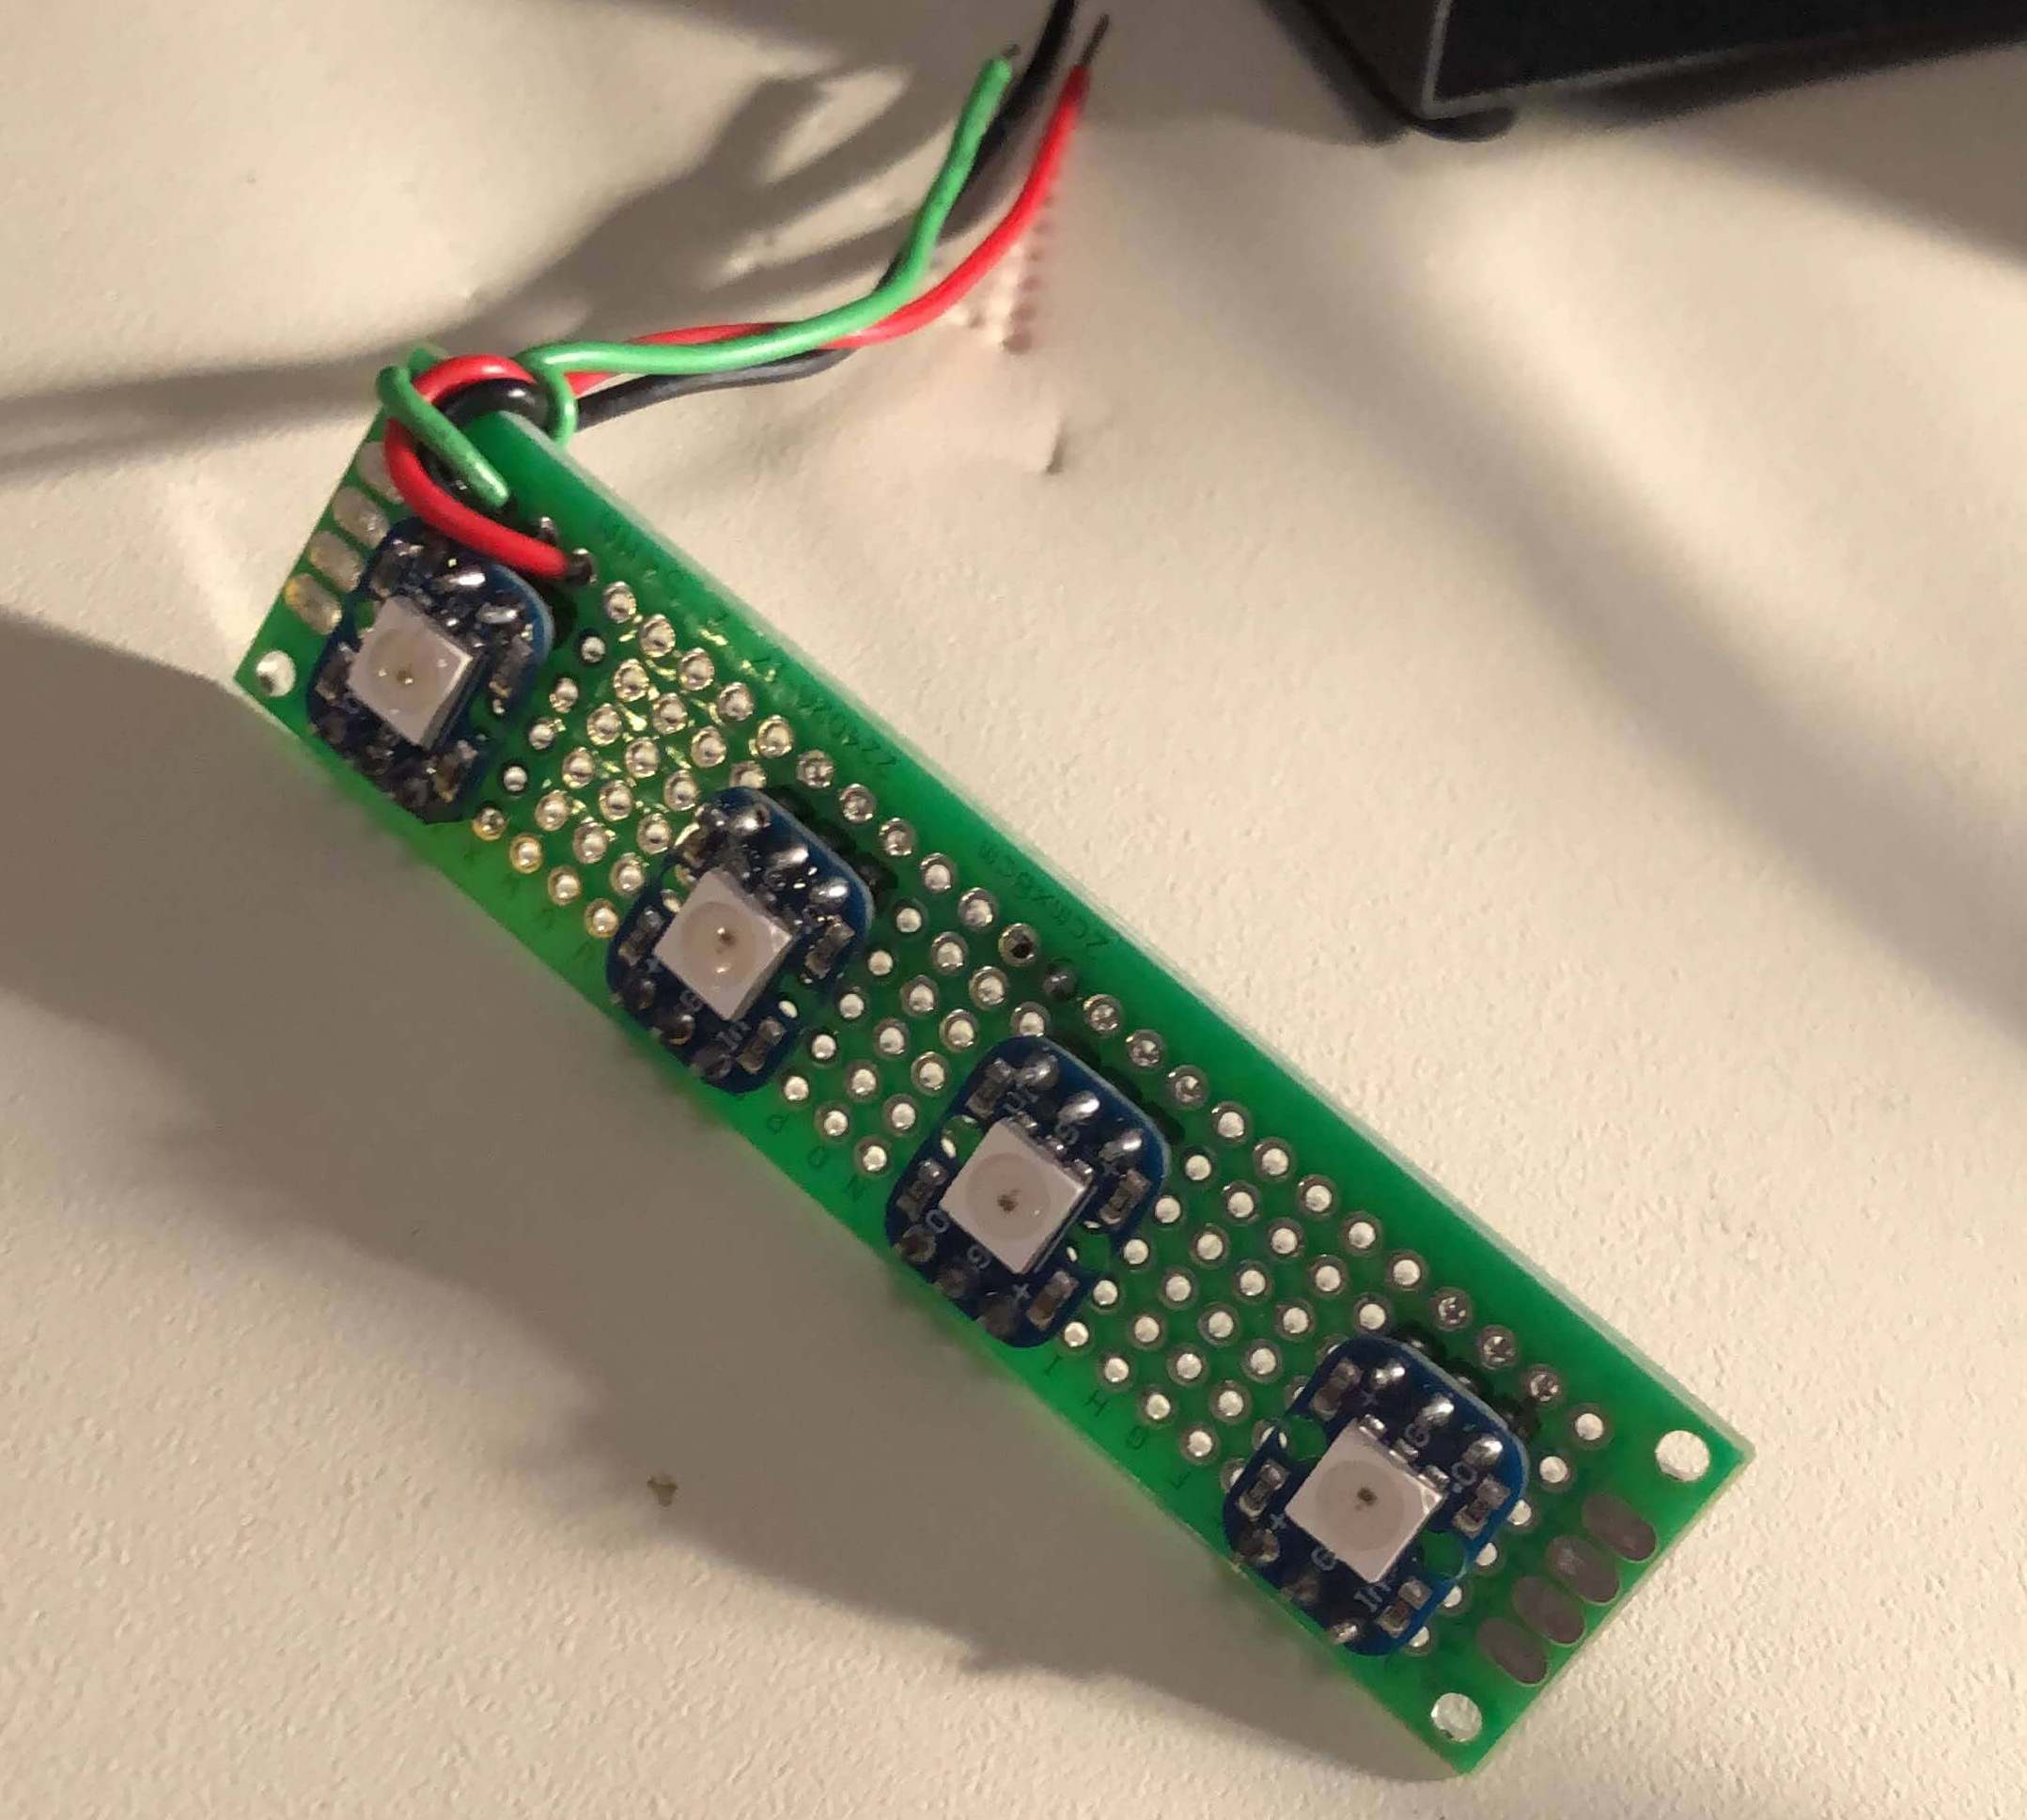
Lights 2.0
With the breadboard refactor underway, it seemed healthy to revisit the LED situation. Clearly multiplexing wasn't going to work without employing some additional domain-specific ICs, but I also didn't feel like wasting precious prototyping time on a solved problem. I decided to go with the easy solution, Individually Adressable LEDs. I built these custom PCBs to provide power, data, and ground lines to the LEDs, and soldered pairs of header pins so I could mount them to the breadboard and position them perfectly over each key. I also upgraded from the teeny-tiny PCB-mountable buttons to the much beefier and more pleasantly tactile Cherry MX Blues commonly found in high-end mechanical keyboards.

Working Demo
With all of the control elements working as intended, I considered the UI of the prototype complete. The motorized fader works as a single input for every situation, and nearly instantly jumps to the position of whatever value you need to modify. And, best of all, it allows you to control any of the parameters with finesse, to make very small adjustments or wide sweeping movements, while maintaining total control.
The ESP32 is still pretty much the same as an Arduino, and as such, can't handle CD quality audio playback. So I've saved that problem for another day. Here's the video of the working demo again. I hope you've enjoyed this in-depth walk-through of the process. When I get the audio portion working, another post will be in order!